Restring the First Love Dolls by Marx

First Love is a 16 inch vinyl babydoll from the 1970's. She was made by Marx, which was a German company. She is a strung babydoll and is very poseable. She has an extra joint at the waist.
First Love is easy to restring. You just need the right tools and supplies. First Love is easy to restring because the openings in the arms, legs and neck are a little larger than modern dolls; therefore not as much struggling to get the plugs and cords inside the limbs.
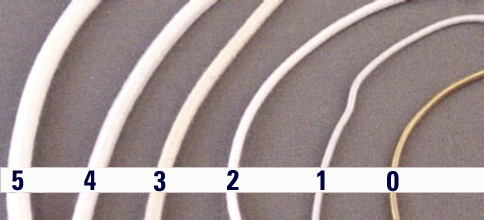
You'll need 5 of our medium size stringing hooks and one package of the #4 stringing cord, as well as 7 inch hemostats for reaching inside the doll to grab the cord. Sometimes a needlenose pliers will work in place of hemostats even though they're not as long.
Below are photos of the hooks, cord and hemostats. We have all these items in our doll shop:

CORD HOOKS in THREE SIZES. YOU NEED MEDIUM SIZE.

STRINGING CORD SIZES. YOU NEED SIZE 4.

7 INCH HEMOSTATS
![]()
Overview of this Project

This photo shows the cord arrangement that we are aiming for. One piece of cord is used to connect the legs to the head (this cord has purple beads on it for identification.) The cord is arranged from one leg up to the head and back down to the other leg.
And a second piece of cord attaches the two arms (this cord has peach color beads on it for identification.) The cord for the arms goes straight across, shoulder to shoulder.
The stringing method is almost the same as our Classic stringing instructions, except you don't need to use a large bead in the middle of the body. The body parts on First Love hold the cord together in the middle, so you don't need to use a bead.
PREPARATION:
1. Remove the existing cord and plugs from the arms, legs and neck. Use hemostats to pull them out. The original plugs are very flimsy and I do think they are getting fragile with age as well; so you do NOT want to keep them. The plugs break easily. Most likely they'll break into pieces when you pull them out.
2. Then, it's a VERY good idea to lay out the pieces as shown in the photo above (or the one below.) This will help you keep the body parts in the right order as you are working. You don't want to finish the stringing, only to realize that the arms or the legs are on the wrong sides. (Ask me how I know this.) So now, whatever doll I'm working with, I lay her out on the table in order and I haven't had any mixups since.
RESTRING BODY FIRST:

3. This step will string the head, both body pieces and the legs together, using one cord. We're not doing anything with the arms yet. Cut a piece of #4 cord approximately 18 inches long.
4. Start with the head. Insert a medium size hook in the neck, with the hook sticking out. Hold onto the hook with the hemostats until you get the cord attached (so the hook doesn't fall inside the head.) Fold the cord in half, and attach the hook to the folded part (in the middle.)
5. Thread both ends of the cord through the top half of the body, first through the neck opening and then through the lower opening in the same piece. You'll need the hemostats for this because the holes inside the top body piece are at angles from each other. Pull the top half of the body snug on the head.

6. Next thread the two pieces of cord through the small hole in the waist of the lower body piece. Pull snug with the other pieces.
7. Using the hemostats, pull the cord through the hip holes. Pull one cord through each hip hole. You can see that the cords come out of each hip hole (beads are only for identification.)
8. Insert a medium hook in the top of one leg, using hemostats to hold onto the metal hook. If you have to squeeze and push the hook into the hole with the hemostats, that's ok. It's good if they're a tight fit.
9. Then put the hook on your cord and push the end of the cord through the body and OUT the OTHER hip hole, as shown in the photo below. Pull the leg up snug with the body:

10. Attach the second leg the same way: insert a medium size hook inside the leg and hook the leg to the piece of cord that is for that leg.

11. In this closeup you can see the hook is hanging on one of the cords, the other cord is loose. Tie the ends of these two cords together ONCE, as if you were tying your shoes. So, tie the cord once and then pull on the cords at the same time - to tighten everything from neck, to body pieces and legs until all the pieces are snug together.
12. Now, PULL HARD on the cords again to really get some good tension.
You may want someone to help you at this point, if you feel like you're running out of fingers and hands. Make everything very snug and tight without being TOO tight. It is possible to overdo the tension so there's a bit of a judgment call on whether the tension is tight enough or too much. If you go way overboard you can break the cord or damage the doll.
13. When everything is very snug and tight, then tie the cords a second time so they're knotted (tie the knot tight so it will hold.) I usually tie it a third time for good measure. When I cut off the extra cord, I leave at least one inch of cord on the ends so the knot cannot undo itself.
14. Some people apply a little glue to the knot as well, but ONLY use white craft glue such as Elmers Household white glue or other good quality white glue. If you use superglue it can melt the cord. Most other glues will also damage the rubber. So I don't use anything but white glue. It's a good idea to do this because the elastic cord can wriggle loose of it's knot otherwise.
15. Shove the ends of the cords inside the doll body where they won't show. The hemostats are useful for shoving the bits of cord.

NOW THE ARMS :
16. Insert a medium size hook in one arm.
17. Use a 10 inch piece of #4 cord, fold it in half, and attach the hook where you've folded the cord. Thread both ends of the cord through the upper body (use hemostats to help you) and pull them out the other armhole.

18. Put a medium size hook in the second arm and hook it to one of the cord pieces.
19. Tie the ends of the cord ONCE and pull the arms snug. When they are at the right tension, then tie the cords a second time (tie it tight) and a third time for good measure.
20. Cut the cords short, leaving at least 1 inch clear of the knot and shove the ends inside the doll's body. Again, you can apply white glue to the knot if you want to.

Finished! First Love is in once piece again, and she can hold up her own arms, legs AND head all by herself!
The sculpting on this doll is very pretty. I have wondered if the Berenguer family in Spain were the artists who designed her because she does resemble their dolls. She is one of the first dolls to be made with the translucent vinyl, too.

![]()
We have a special restringing kit for FIRST LOVE in our doll shop. CLICK HERE..


